This article explains how to customize Document Templates. All document templates are HTML-based and can be modified as needed. This allows to tailor the layout and content of the financial documents to the specific business requirements.
Step-by-step guide to customizing a document template #
- Open the Legal Entities tab:
- In the Salesforce environment, go to the Legal Entities tab.
- Open the Legal Entity record:
- By default, there is one Legal Entity record created with predefined data from the Salesforce org.
- Click on this record to open it.
- Review the default templates:
- In this record, the default templates for various documents will be shown (e.g., Invoices, Quotes).

- Open a template for editing:
- Click on a template that requires a customization. Inside, these fields will be displayed:
- Name – The template’s name.
- Object Name – The API name of the object linked to the template.
- Document Orientation – Landscape or Portrait.
- Click on a template that requires a customization. Inside, these fields will be displayed:
- Edit the template body:
- Click Edit Template to open the template editor.
- The first step in the wizard is the Editor screen, where the changes could be made.

- Preview the changes:
- Click Preview to review the changes before saving them.
- Select a record as a preview example, a number sequence, and the language.

The preview only uses this data as a data source and does not change it.
- Viewing the PDF:
- Click Next to view the PDF and review your changes.
- Saving the template:
- If the customization is successfull, go back and click Save on the first screen of the wizard to save the template.

Using multiple templates for the same object #
- Multiple templates for the same object could be created. There is a default template specified in the Legal Entity record. This template will be used for the document by default unless another value is specified in the Template Lookup.
Template Syntax #
Adding free text:
- To add free text to the template, simply enter the text directly.

- If translations are required, it’s necessary to use Custom Labels. The syntax is:
{{data.labels.namespace__labelname}}- Examples:
{{data.labels.finblick__DocumentTemplatePerformancePeriod}}
{{data.labels.EndDate}}
Adding a document field:
- To add a field from the object, use the following syntax:
{{data.objectname.fieldname}}- Example:
{{data.finblick__Invoice__c.finblick__BillingAddress__Street__s}}Adding a field from the parent object:
- To add a field from the parent object, use the following syntax:
{{data.objectname.parentlookup.fieldname}}- Example:
{{data.finblick__Invoice__c.finblick__Account__r.finblick__VAT__c}}Loops (Child Object):
- To iterate through multiple child records, use the following syntax:
{{#each data.objectname.childlookupfield.records as |key|}}
{{/each}}
Note: The key must match the name of the child object.
- Example:
{{#each data.finblick__Invoice__c.finblick__InvoiceProducts__r.records as |finblick__InvoiceLine__c|}}
<div>{{finblick__InvoiceLine__c.finblick__Quantity__c}}</div>
{{/each}}
Сustomizing document templates in HTML allow full control over the skeleton of your financial documents. The template is divided into several main sections:
- Header: Contains company information, logos, or branding elements that appear on every page.
- Footer: Used for additional text, legal disclaimers, or repeated summary information.
- Main Body: Holds the dynamic content of the document, such as line items, totals, and custom fields.
- Watermark (optional): Can be added for internal notes, “Draft” marks, or other visual cues.
Within these sections, placeholders and loops can be applied to dynamically populate data, while conditional logic allows for customizing content based on language, document type, or other criteria. This structure ensures that templates remain consistent and professional while supporting fully flexible document generation.
Template Skeleton #
<!DOCTYPE html>
<html>
    <head>
        <style>
            .content {
                break-inside: avoid;
                position: relative;
            }
            /* Remaining content styles here */
        </style>
    </head>
    <body>
        <div class="generator_watermark">Watermark</div>
        <div class="generator_header" style="height: 20mm">
            <style>
                /* Header styles */
            </style>
            <!-- Header content -->
        </div>
        <div class="generator_first_header" style="height: 20mm">
            <style>
                /* Header styles */
            </style>
            <!-- Header content -->
        </div>
        <div class="content">
            <!-- Page content -->
        </div>
        <div class="generator_footer" style="height: 20mm">
            <style>
                /* Footer styles */
            </style>
            <!-- Footer content -->
        </div>
        <div class="generator_first_footer" style="height: 20mm">
            <style>
                /* Footer styles */
            </style>
            <!-- Footer content -->
        </div>
    </body>
</html>
Template’s body consists of 4 elements:
- Main body
<!-- Style can be placed in the <head> of the document -->
<style>
    .content {
        break-inside: avoid;
        position: relative;
    }
    /* Remaining content styles here */
</style>
<div class="content">
    <!-- Page content -->
</div>- Watermark
<div class="generator_watermark">Watermark</div>Watermark is a line of text displayed during file’s preview.
Watermark will look like this:

- Header
<div class="generator_header" style="height: 20mm">
    <style>
        /* Header styles */
    </style>
    <!-- Header content -->
</div>
Header’s container must include the “height: #mm” style. The height must be defined in mm. We don’t recommend adding any other styles to the header’s container. All styles applied anywhere outside of header’s container won’t be applied to header. They should be defined inside of the header, either on elements directly or inside of <style> tag inside of the header.
If header’s content clips into the main body, the most probable reason is that header content’s height exceeds the header container’s height.
As an example, a logo with 20mm height and slogan below was added, and header’s height is 24mm. If slogan occupies more than 4mm in height, it will clip into main body.
If it’s necessary to have a separate header on the first page, the following container could be used:
<div class="generator_first_header" style="height: 20mm">
  <-- same restrictions as for normal header apply -->
</div>
Example header:
<!DOCTYPE html>
<html>
    <head>
        <style>
            .content {
                break-inside: avoid;
                position: relative;
            }
        </style>
    </head>
    <body>
        <div class="generator_header" style="height: 30mm">
            <style>
                .header-container {
                    display: flex;
                    justify-content: space-between;
                    align-items: center;
                    width: 100%;
                    height: 19mm;
                    padding: 0 20mm;
                    border-bottom: 1px solid black;
                }
                .logo {
                    max-height: 100%;
                }
                .slogan {
                    text-align: right;
                    font-weight: 600;
                    font-size: 4mm;
                    color: {{%%finblick__Invoice__c.finblick__LegalEntity__r.finblick__BrandColor__c%%}};
                }
            </style>
            <div class="header-container">
                <img class="logo" src="{{%%finblick__Invoice__c.finblick__LegalEntity__r.finblick__LogoUrl__c%%}}" />
                <div class="slogan">{{%%finblick__Invoice__c.finblick__LegalEntity__r.finblick__BrandSlogan__c%%}}</div>
            </div>
        </div>
        <div class="content">
            <div>Page Body</div>
        </div>
    </body>
</html>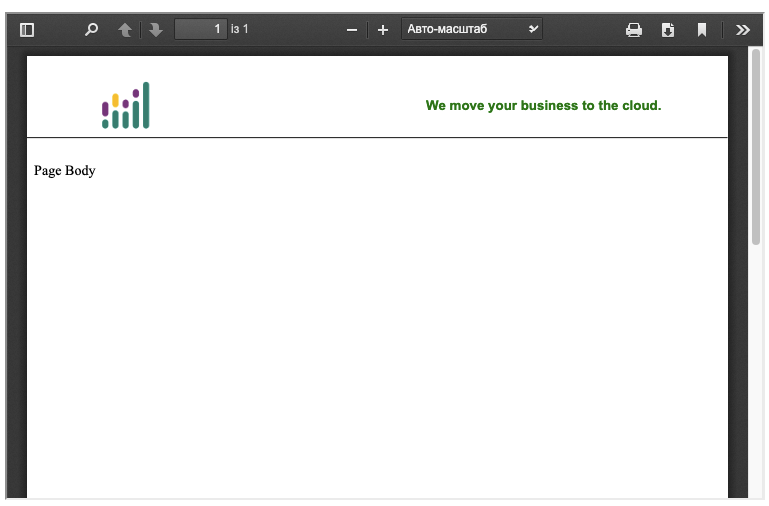
- Footer
<div class="generator_footer" style="height: 20mm">
    <style>
        /* Footer styles */
    </style>
    <!-- Footer content -->
</div>
Footer has the same list of restrictions as header:
- Footer’s container must include the
"height: #mm"style. - All styles applied anywhere outside of footer’s container won’t be applied to footer.
- If footer’s content clips into the main body, then footer content’s height exceeds footer container’s height.
If it’s necessary to have a separate footer on the first page, the following container could be used:
<div class="generator_first_footer" style="height: 20mm">
  <-- same restrictions as for normal footer apply -->
</div>
Example footer:
<!DOCTYPE html>
<html>
    <head>
        <style>
            .content {
                break-inside: avoid;
                position: relative;
            }
            .info {
                font-weight: 600; /* please note that this style doesn't apply to info class in footer */
            }
        </style>
    </head>
    <body>
        <div class="content">
            <div>Page Body</div>
        </div>
        <div class="generator_footer" style="height: 30mm">
            <style>
                .footer-container {
                    display: flex;
                    justify-content: space-between;
                    align-items: center;
                    width: 100%;
                    height: 19mm;
                    margin-top: 0;
                    padding: 0 20mm;
                    border-top: 1px solid black;
                }
                .logo {
                    max-height: 100%;
                }
                .info {
                    text-align: right;
                    font-size: 4mm;
                    color: {{%%finblick__Invoice__c.finblick__LegalEntity__r.finblick__BrandColor__c%%}};
                }
            </style>
            <div class="footer-container">
                <img class="logo" src="{{%%finblick__Invoice__c.finblick__LegalEntity__r.finblick__LogoUrl__c%%}}" />
                <div class="info">
                    <p>Cloudwharf GmbH</p>
                    <p>München, Germany</p>
                </div>
            </div>
        </div>
    </body>
</html>
Additional notes #
- Elements, defined in the previous section of this document, can be placed in any order. As long as they have their respective classes, they’ll be displayed in the correct places.
- Be cautious when using
@pageat-rule because it causes unintended side effects. In particular, using margins in@pagecauses main body to fill an entire page, and both header and footer will clip into it.


