This article provides guidance on configuring the user interface and walking through the process of generating the first financial document in Finblick. Key elements of the UI setup, such as page layouts and components, are outlined to ensure that all required features are visible and accessible. Once the configuration is complete, the document generation flow is demonstrated step by step, allowing the setup to be validated in practice.
Finblick supports four financial documents:
- Quote,
- Order,
- Invoice, and
- Credit Note.
Below is an example illustrating how the configuration and initial document generation can be performed for a Quote. The setup process for the Order object follows a similar approach and is outlined here in less detail. No additional configuration is required for Invoices and Credit Notes.
The user interface can be designed flexibly according to individual requirements. The provided example demonstrates how key fields, components, and actions can be added to the page.
Layout configurations for native Salesforce objects such as Quote and Order are not included in the package. In cases where existing automations or custom developments are already implemented, the configuration extends beyond the scope of this setup guide. Such adjustments can be implemented internally using Flows or carried out by Cloudwharf or a partner company upon request.
Preparation: Step-by-step guide for editing the Opportunity layout: #
First, it’s necessary to modify the layout of the Opportunity object.
- Go to Setup:
- Click the gear icon in the top right and select Setup.
- Search for Object Manager in the Quick Find box:
- Click on Object Manager.
- Find the Opportunity object:
- Search for Opportunity in the list of objects and click on it.
- Select Page Layouts:
- In the left-hand menu of the Opportunity object, click on Page Layouts.
- Choose the layout to edit:
- A list of available page layouts will be displayed. Click on Opportunity Layout.

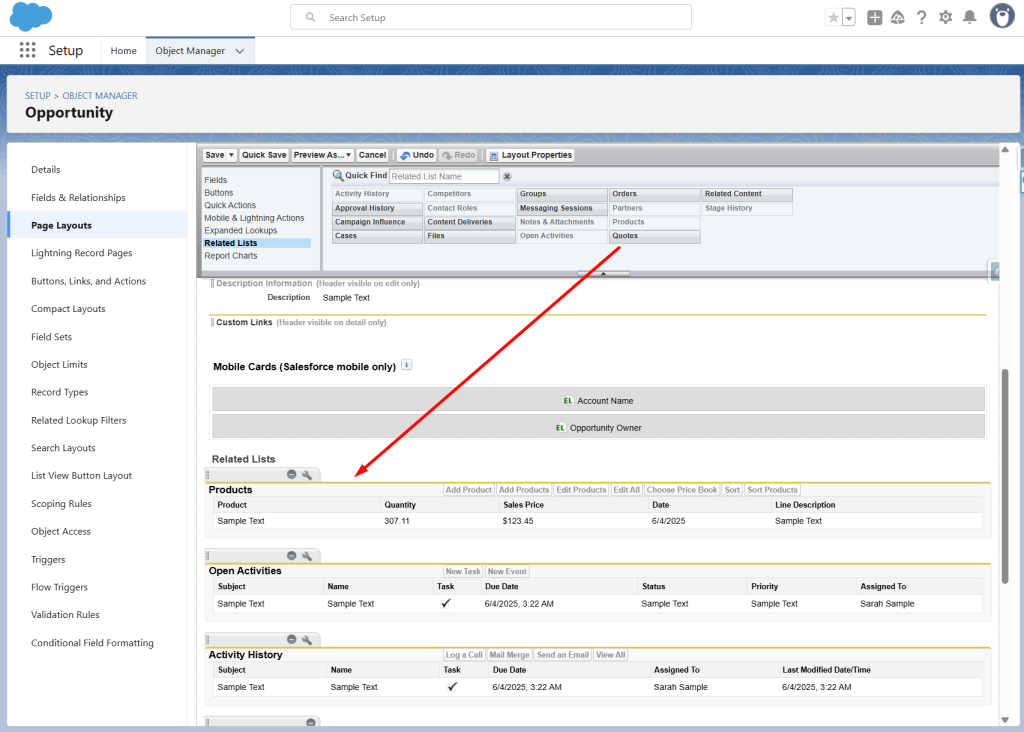
- Go to the Related Lists:
- Various options such as Fields, Buttons, and Related Lists are displayed at the top of the Opportunity layout editor.
- Click on Related Lists.

- Find the Quotes related list:
- In the list of available related lists, look for Quotes.
- Add the Quotes related list:
- Drag and drop the Quotes related list into the Opportunity layout, placing it in the section where it should be displayed (e.g., below the Opportunity details section).
- Save the layout:
- Click Save to apply the changes to the layout.
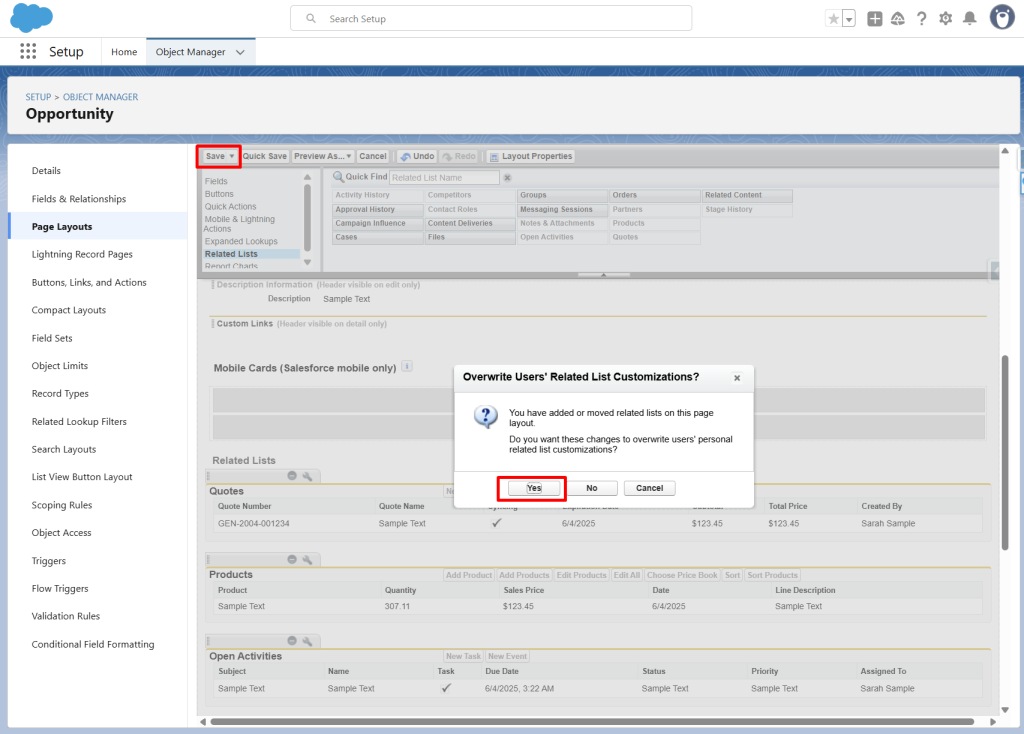
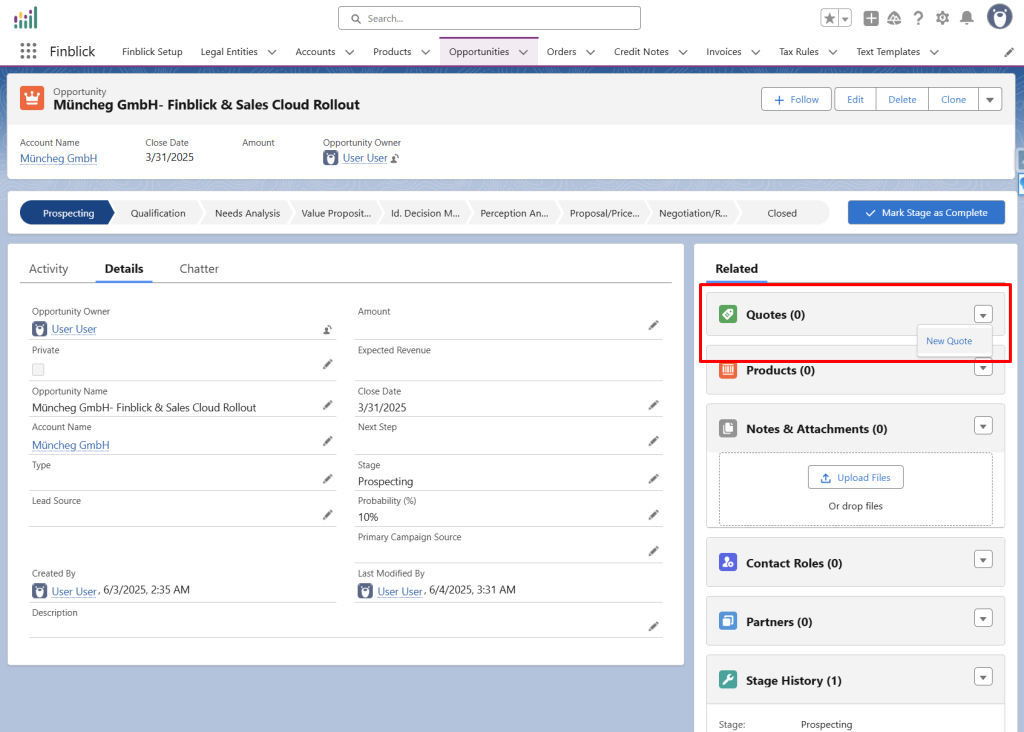
- Switch back to the Opportunity.
- After switching back to the Opportunity, the option to create a Quote becomes available. 🥳
Step-by-step guide to configuring the Quote UI #
Create a new Quote #
- Create a new Quote:
- Go to an Opportunity page and click New Quote.

- Fill in the required fields:
- Enter all the necessary information, especially the Quote Name.
- Save the Quote:
- Click Save to create the Quote.

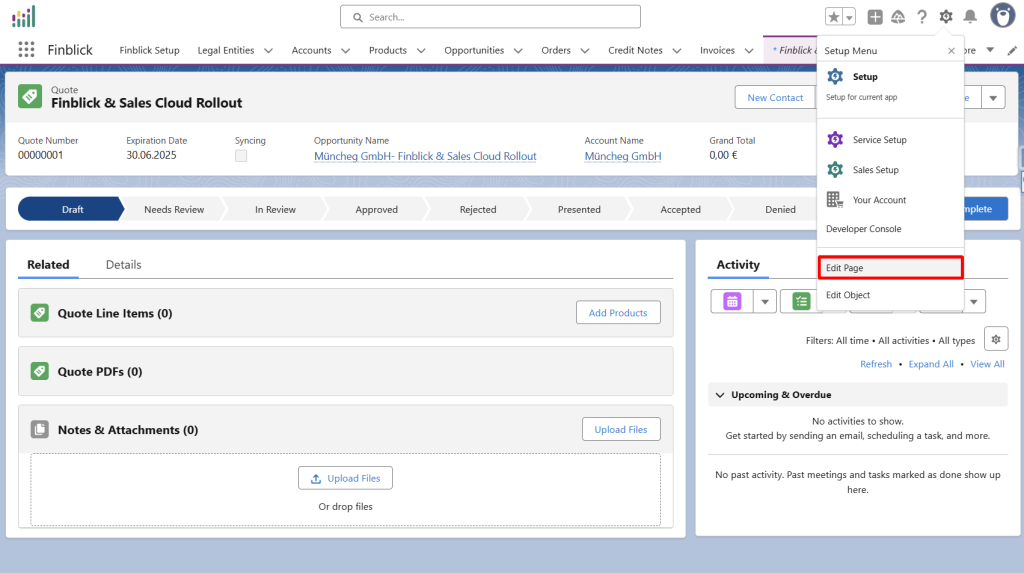
- Go to the created Quote:
- After saving, a redirect to the Quote page will occur. Open the newly created Quote.
Configuring the Quote UI #
- Switch to edit mode:
- Click the small gear icon in the top right.
- Select Edit Page to configure the Quote page.
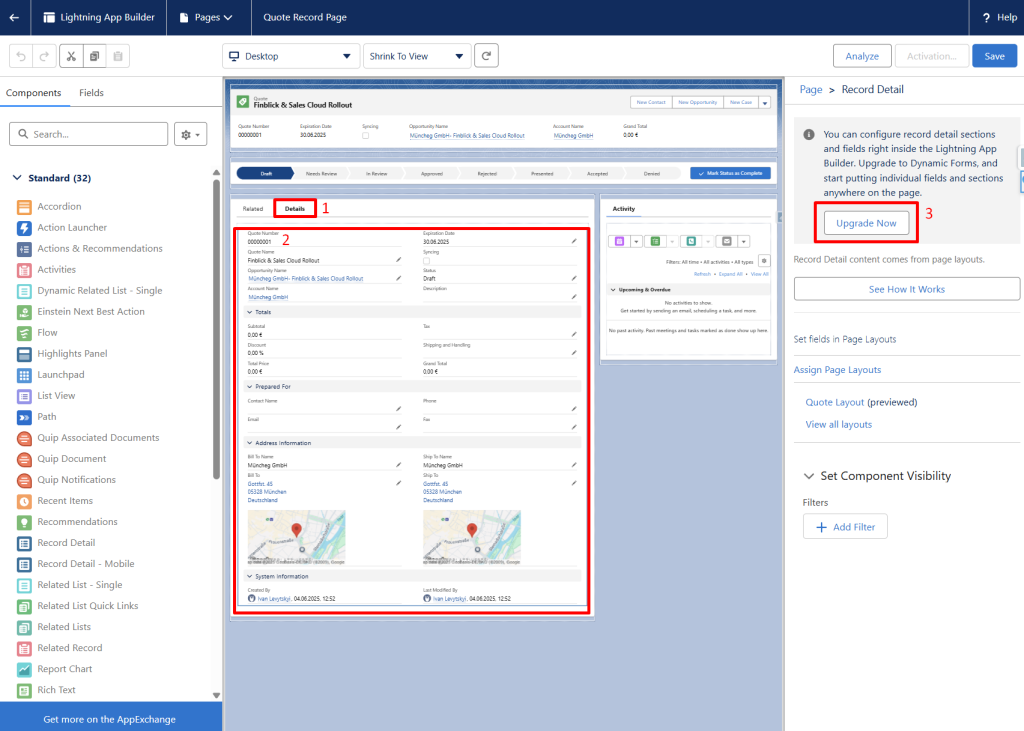
- Enable dynamic forms:
- Go to the Details section of the record.
- Click inside the inner container.
- In edit mode, make sure that Dynamic Forms and Dynamic Actions are enabled. To do this, click Upgrade Now.
- Follow the assistant and complete the process.
- Click Continue.
- Check the box and select the layout.
- Then click Finish.

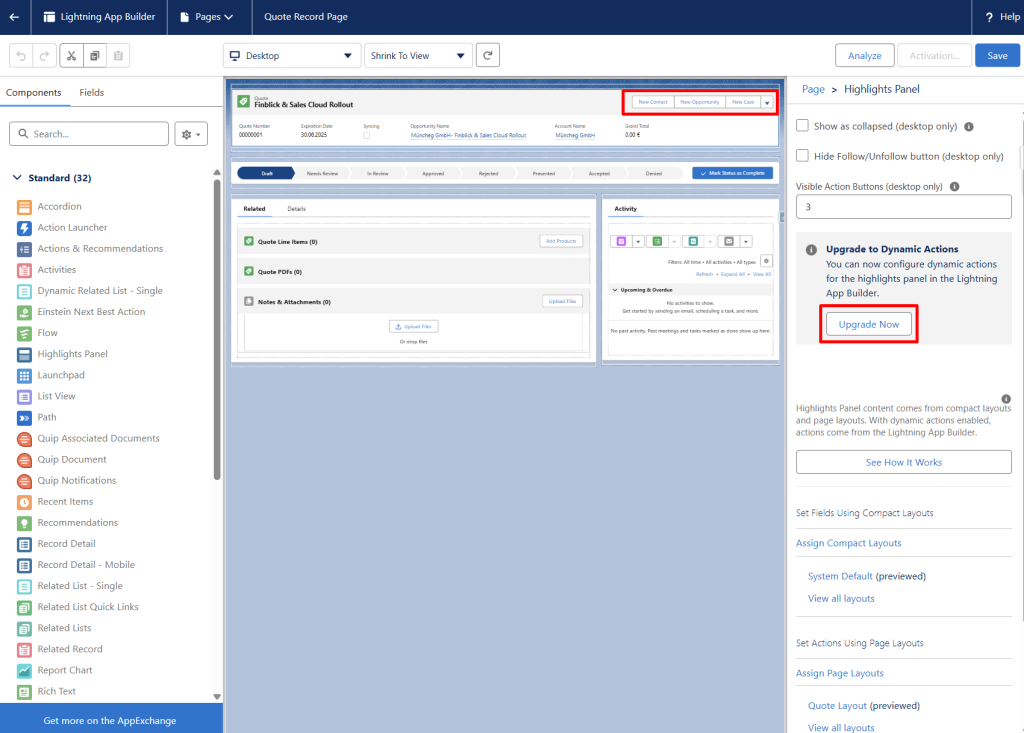
- Enable Dynamic Actions:
- As was done with Dynamic Forms, Dynamic Actions will now be enabled. First, click on the Actions section.
- Then click Upgrade Now.
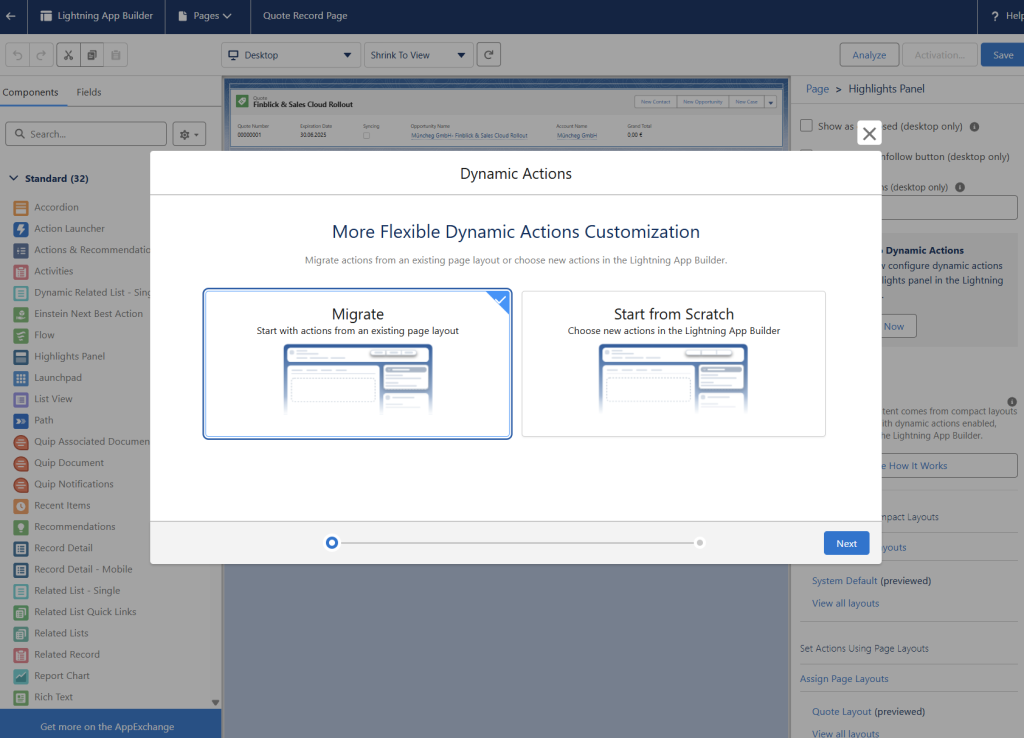
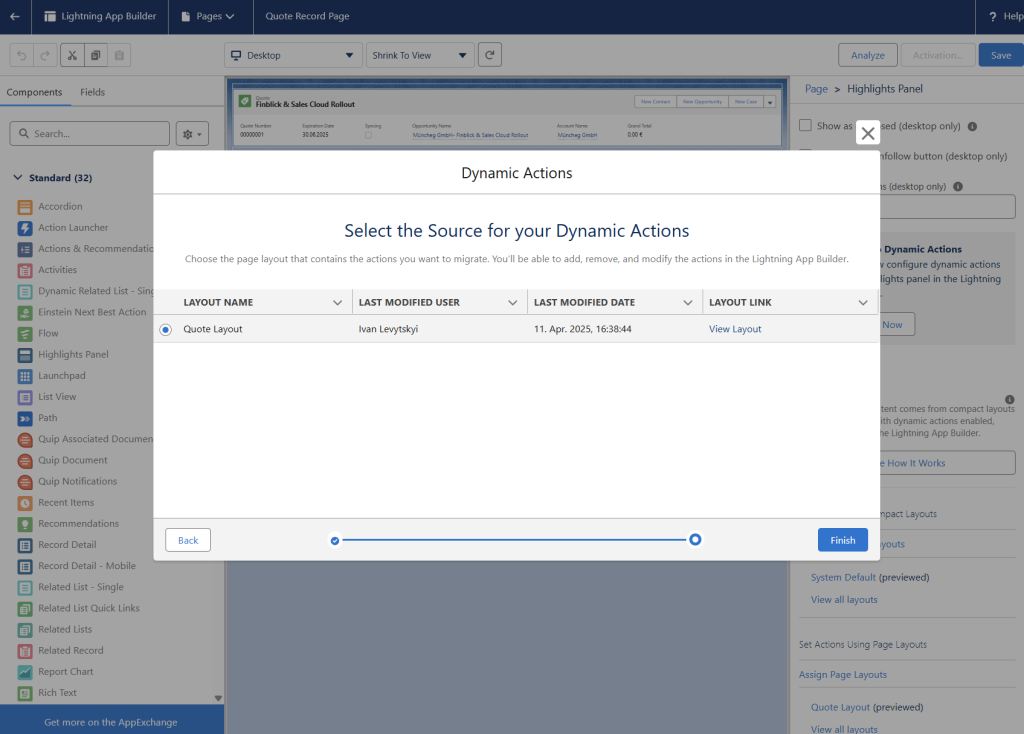
- Follow the wizard and complete the process.
All relevant fields and actions will now be added to the Flexi page. The setup can, of course, be tailored to specific business requirements. The following example layout is recommended for most customers:
- Positions Tab: Add a new tab called “Positions”
- Click on the container that holds the tabs (see screenshot below).
- Click Add Tab.
- For the tab label, select Custom.
- Enter Positions as the custom label.
- Then click Done.

- Positions Tab: Add Text Editor component for “Header Text” and “Footer Text”
- Go to the Components tab on the left.
- First, drag a custom component labeled Text Editor to the Positions tab and set the Field Type to Header Text.
- Then, drag the same custom component labeled Text Editor to the Positions tab and set the Field Type to Footer Text.
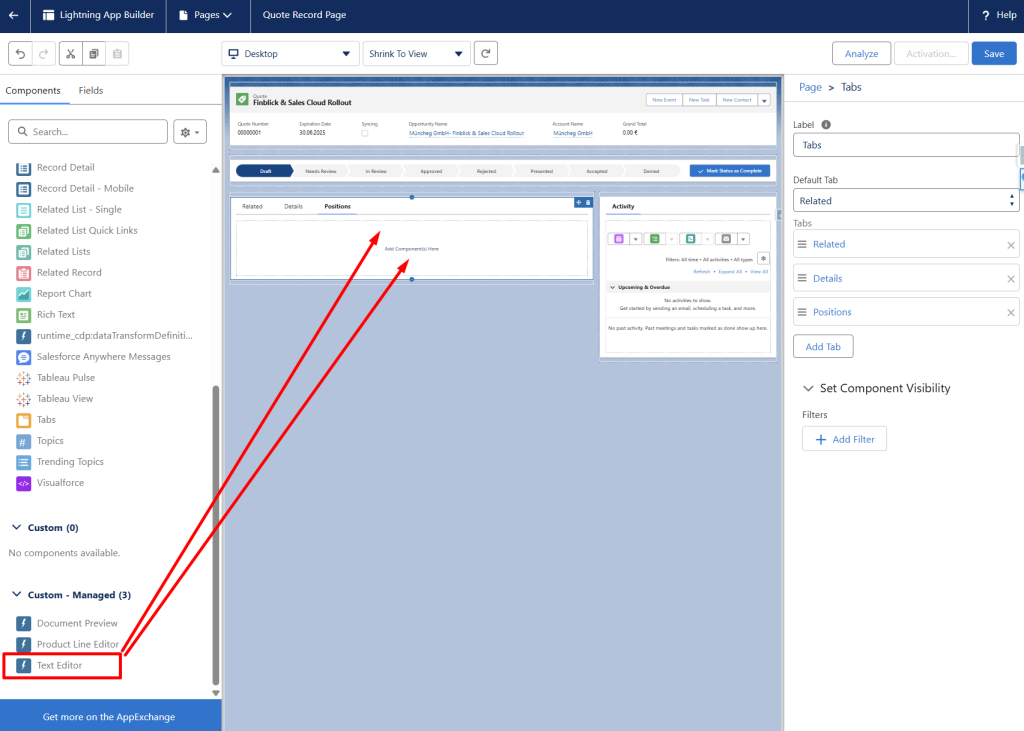

- Positions Tab: Add the Product Line Editor to both field sections
- Go to the Components tab on the left.
- Drag the Product Line Editor component between the Header Text and Footer Text.

- Add the necessary Quick Actions
- Go to the top-level container with the available actions.
- Click Add Action.
- Select the following quick actions (one-by-one): Generate Quote Document, Clone, Convert to Order.
- Click Done.
- Remove unnecessary standard buttons and drag Finblick Quick Actions to the top of the list.

- Add a new field section called “Template” with information about the document template.
- Go back to the Details tab.
- Go to the Fields tab on the left.
- Drag to the layout a new field section labeled Template.
- Add the following fields: Legal Entity, Number Sequence, Language, and Template.
- Click Save. This ensures that the template data being used can always be viewed.


These fields (except Language) are used to control the template configuration. If it’s necessary to prevent users from changing this setup, it’s best to keep these fields hidden from the user interface.
- Save, activate the page, and admire a new Quote layout 🤩
- Now just click Save in the top right corner.
- Perform the page activation, assign it as Org Default for Desktop and Phone, click Save.
- Afterward, the new Quote layout can be viewed on any Quote record.

Add Related List to the Quote Object #
Next, Files should be added as a related list to the Quote object, similar to the setup previously done for the Opportunity.
- Go to Setup:
- Click the gear icon in the top-right corner and select Setup.
- Search for Object Manager in the Quick Find box:
- Click on Object Manager.
- Find the Quote object:
- In the list of objects, look for Quote and click on it.
- Select Page Layouts:
- In the left-hand menu, click on Page Layouts.
- Choose the layout you want to edit:
- A list of available layouts will be shown. Click on Quote Layout.
- Go to Related Lists:
- In the layout editor, the options like Fields, Buttons, and Related Lists at the top will be displayed.
- Click on Related Lists.
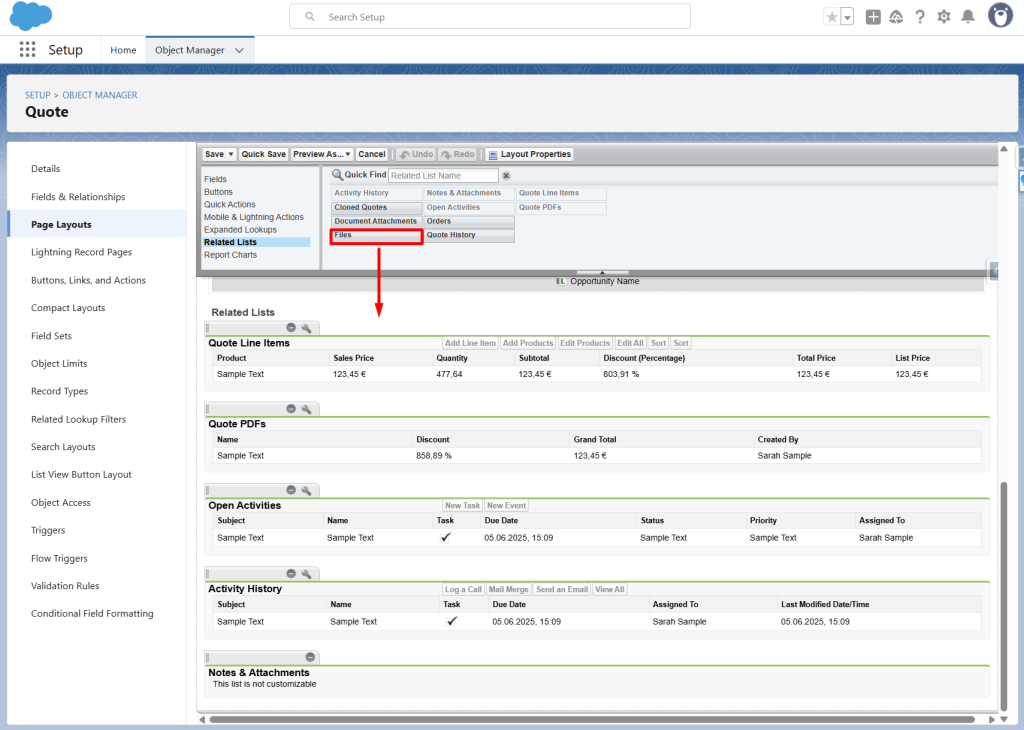
- Find the Related List Files:
- In the list of available objects, look for Files.
- Add the Files Related List:
- The Files related list should be dragged and dropped into the Quote layout, positioned in the desired location.
- Save the layout:
- Click Save to apply the changes to the layout.
How to Create and Assign Price Books and Tax Rules to a Document #
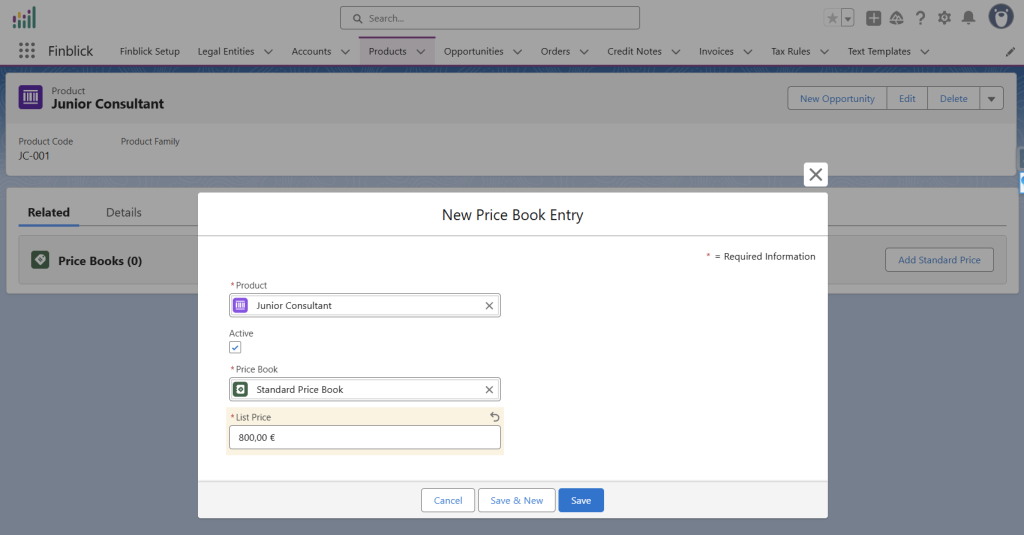
Step 1: Create a Product
- Open the App Launcher and navigate to the Products object.
- Click New to create a new Product.

- Add the Product to the Standard Price Book
- In the newly created product, go to the Related tab.
- Click on Add Standard Price.

- Add Price Book Entry
- Enter the List Price and make sure to set the Price Book Entry to Active.
- Make Sure the Standard Price Book is Active
- In a sandbox environment, the Price Book often needs to be activated manually.
- Go to the desired Price Book.
- Check the Active checkbox to enable it.

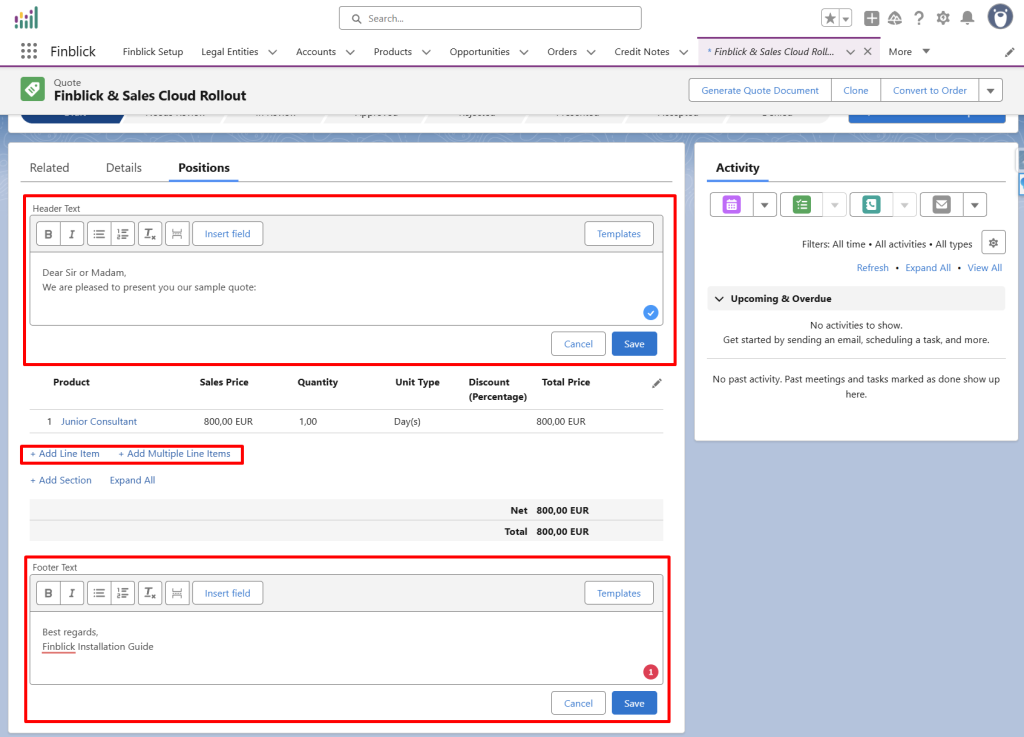
- Add Positions (line items) as well as Header and Footer texts to the Quote
- Simply add the desired Header Texts.
- Add the desired Footer Texts.
- Add all the necessary Positions (line items).
- Save all changes.
Generating a Sample Document (Quote) #
Now it’s super easy to generate the document—in this case, a quote.
- Simply click Generate Quote Document.
- Then click Generate.
- Review the generated Quote.
Configure the Order UI #
- Open any Order page.
- Switch to edit mode:
- Click the small gear icon in the top-right corner.
- Then click Edit Page to start configuring.
- Enable Dynamic Forms and Dynamic Actions as described in Part 2.2.
- Add the Positions tab with the two Text Editor components and the Product Line Editor component, just like it was done for the Quote object in Part 2.2.
- Add the necessary quick actions as described in Part 2.2.
- Add all necessary fields in the additional fields section, including the Template field section, as shown in Part 2.2.
- Add the Files related list to the object, as described in Part 2.3.
- Click Save and perform page activation to apply all changes.


